Description
This KB article serves to help the user use our conferencing spaces on campus. There are two main types of conferencing rooms currently, Microsoft Teams Rooms and Bring Your Own Device (BYOD) rooms. Depending on the room in which you are in, there may be differing instructions for operating and using the systems. Microsoft Teams Rooms are defined by spaces that utilize a Microsoft Teams Conferencing Device located on the the conferencing table in the room. BYOD rooms are defined by conferencing rooms that requires a user to plug in their own HDMI enabled device, such as a laptop.
Lenovo Core/Hub Use and Troubleshooting
Powering On and Off the Device
Rooms with conferencing devices should have their displays automatically turned on and off via light and touch sensors on the conferencing devices touch panel. Upon walking in to the room, wave your hand over the touch panel, if this does not wake the conferencing device up, tap on the control panel. When the device wakes up, the devices' controls will be shown on the control panel and the room's display will turn on.
In order to power off the system, simply leave the room. When the control panel's sensors no longer detect users in the room, and the device is no longer in use the devices' sleep timer will start. When this sleep timer finishes, the device along with the display will be turned off.
In rooms where there are windows with walkways on the other side, it may prove best to angle the control panel away from these windows to avoid the device waking up due to those who walk by said windows. |
How To Invite A Room
To add a room to a meeting use the following steps:
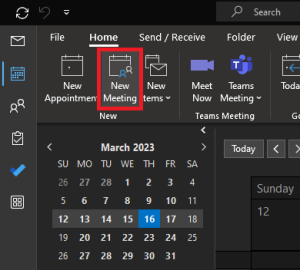
- Open the meeting invitation or create a new meeting in Outlook.
- This may require the meeting organizer's assistance depending on the permissions set on the meeting invite.
- Under the "required attendees" field, add the Microsoft Teams account that belongs to the desired room.
- See room owner if unsure about the Microsoft Teams account name.
- At the bottom of the Teams meeting invitation, select, send or update.
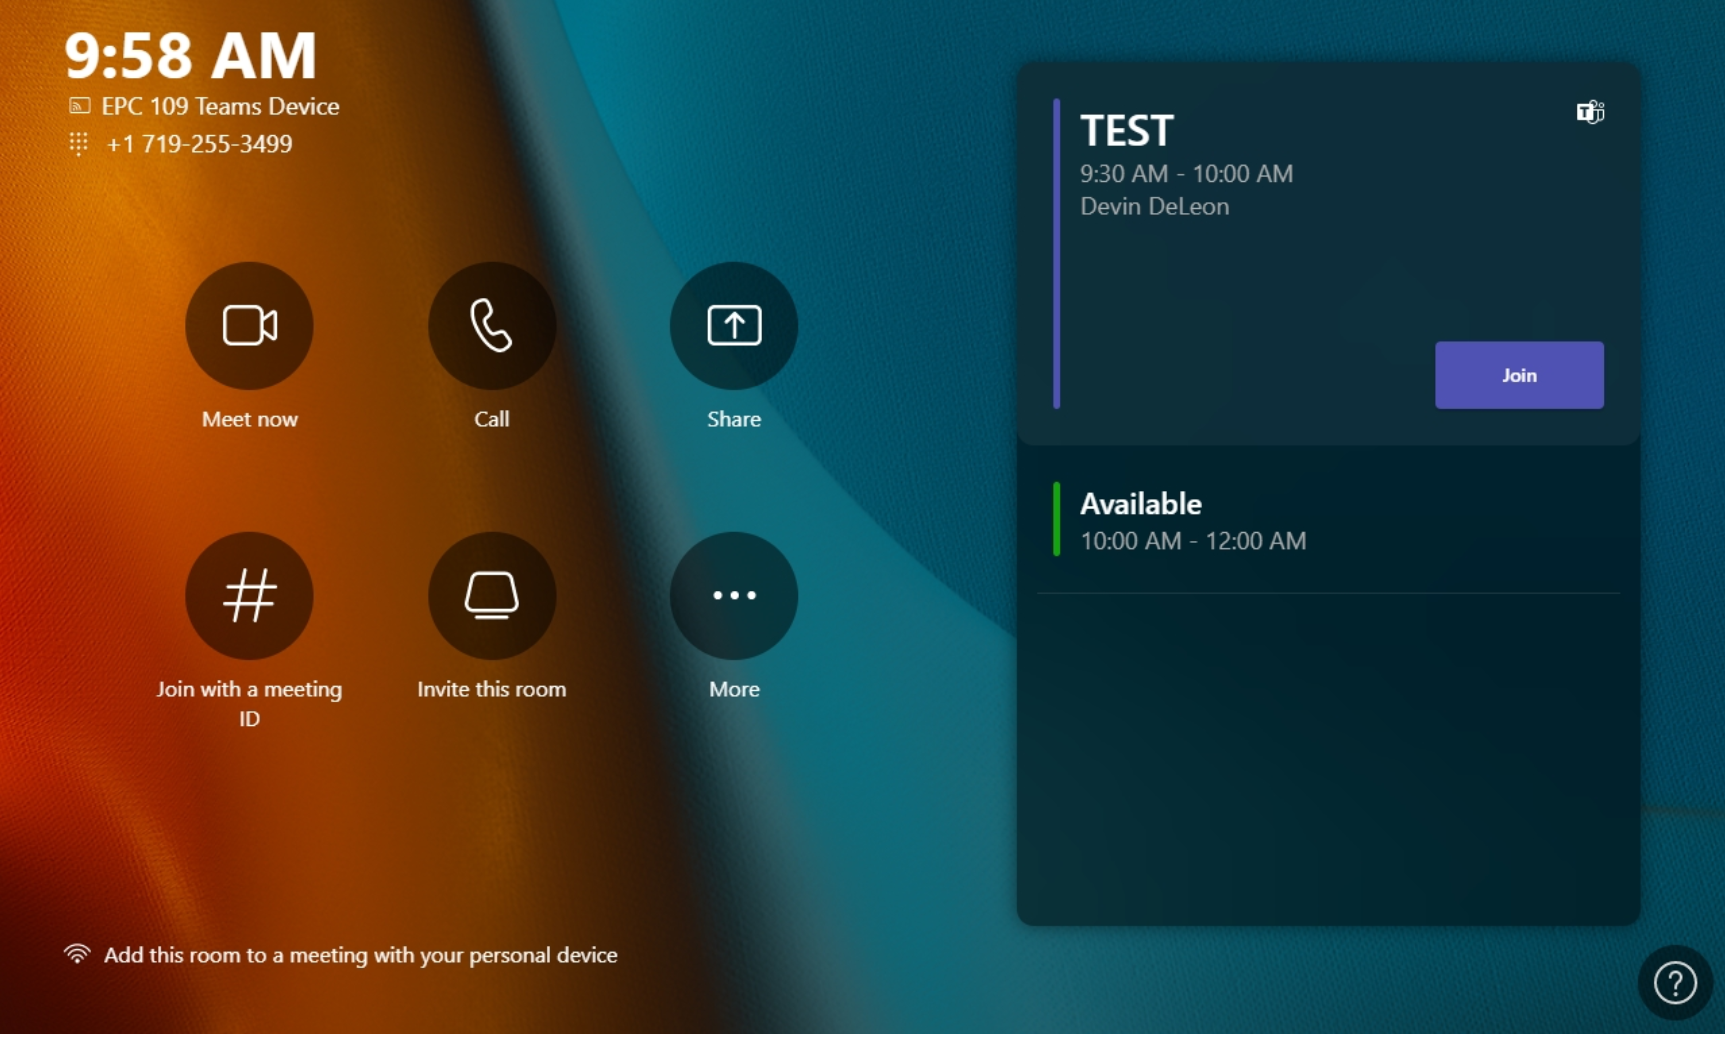
- On the day of the meeting, a information pane will populate on the home screen of the device with a join button.
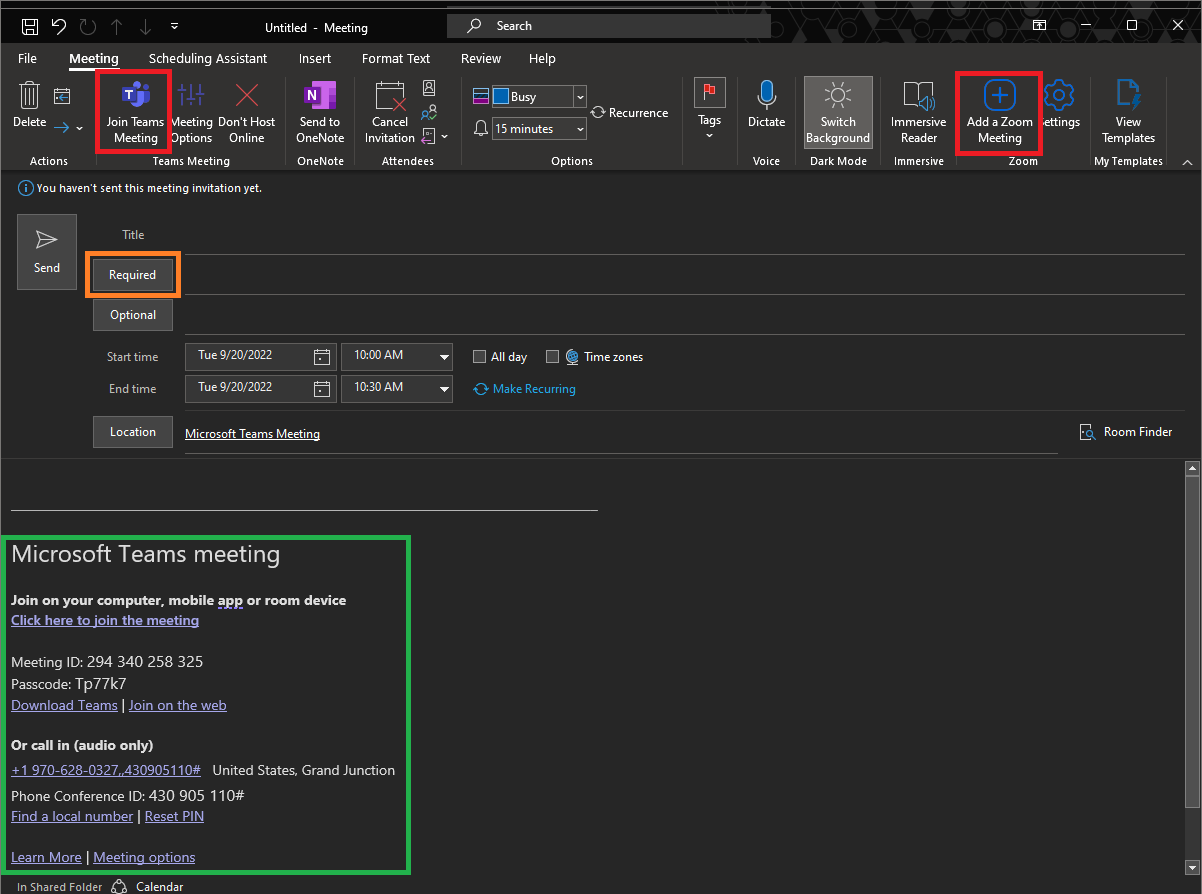
When creating the meeting, add either a Teams meeting invite or a Zoom meeting invite, but not both. |
How To Join A Meeting
To join a meeting in a Teams Room:
- First, ensure a Teams meeting invitation has been sent to the room's device (see steps above).
- On the device's control panel, you will notice a meeting tile(s) with a join button.
- If there is more than one meeting scheduled for the day, navigate up or down through the list to locate the desired meeting.
- The Meeting tiles will have basic information displayed for easier identification of the desired meeting.
- Once the desired meeting has been located, select the "Join" option on the corresponding meeting tile.
- This will join the Microsoft Teams Room device to the meeting room associated with the invitation.
You may also join this meeting on your personal device while in the same room as the conferencing device. If this is done, please ensure to mute the microphone and speakers of your personal device before joining the meeting, as this will cause a feedback loop. |
Meeting Controls
Once inside the meeting, the control panel associated with the Teams Room device, will populate with meeting controls, while the display in the room will show the other meeting participants. The meeting controls that are displayed on the control panel are similar to what you may have already seen in your other Teams meetings. The main difference here, is that adjustments made to the controls will affect the entire room all at once.
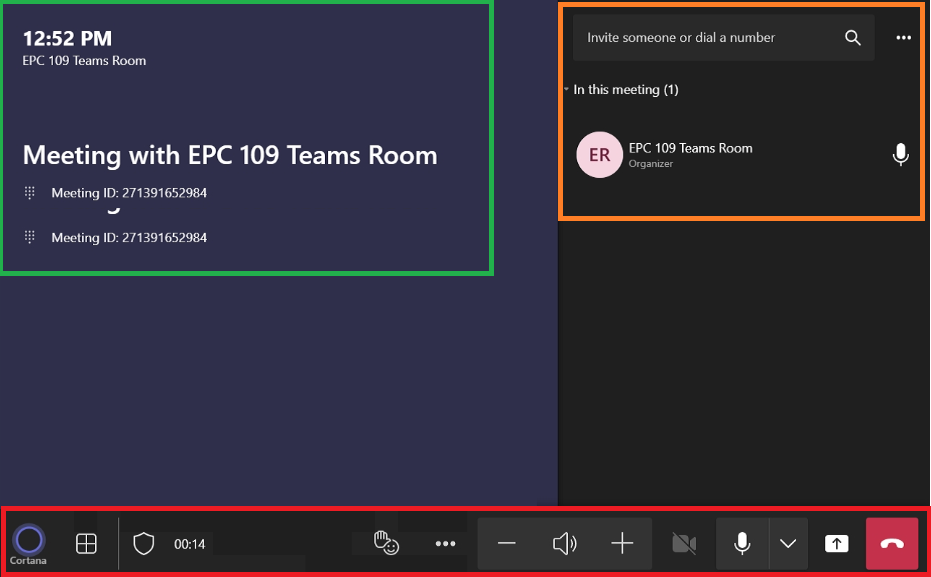
In the photo displayed below shows the control panel of the Microsoft Teams Room device:
- In the top left, outlined in green, the meeting details will be displayed by default
- The pane on the right side of the panel, outlined in orange will allow the user to invite other members of the UCCS directory to the meeting
- The bottom of the control panel displays the meeting controls where the user may change gallery view, react, adjust the volume, mute the camera, share content, and leave the call
While in a teams meeting, the chat and recording feature are only available on your personal device and not the Teams Device. |
Sharing Content
In order to share content from a personal device to the room display:
- From within the meeting, tap the share button on the conferencing device's control panel.
- Plug in the personal device to the HDMI cable connected to the Microsoft Teams Room Device.
- By default, upon plugging in a personal device to the HDMI cable the content on the personal device will automatically be shown and shared to the display regardless of whether or not the Teams Room device is in a meeting.
- Sharing mode will be indicated with a red outline on the room display.
- To quit sharing your screen on the personal device, you may disconnect the HDMI cable, or tap the Share button on the device's control panel.
- If you stop sharing from the device's control panel and the personal device is still connected to the HDMI cable, you will notice on the room display that the content from the personal device is still present.
- This is as intended. You will be able to confirm that you have stopped sharing your content when the room display no longer has a red outline.

Alternatively, if you have joined the meeting from your personal device, you may share content wirelessly to the meeting by selecting the share content option from your personal device's Teams meeting. |
Zoom Meetings
These conferencing devices allows for the use of Zoom meetings as well.
- Zoom meetings should also work with these devices.
- To invite the Teams Room device to a Zoom meeting, add the Microsoft Teams account email to the list of invitees associated with the Zoom meeting
- On the day of the meeting, the device will show a Zoom themed meeting tiles, with general meeting information and a join button
- Press the Join button to join the meeting.
- If access to additional meetings controls are needed such as volume and camera control, tap the "Show meeting on this device" option on the conferencing device's control panel.
Sound Troubleshooting
- Virtual attendees cannot hear anyone in the Teams Room:
- Ensure that the microphone is not muted on the control panel.
- Ensure that the virtual participant does not have their device muted and appropriate audio devices selected.
- If you are still unable to be heard in the meeting, try leaving the meeting and re-joining.
- If this does not resolve the issue, please reach out to the UCCS Service Desk at (719) 255-4357
- Users in the Teams Room cannot hear anyone from the virtual attendees:
- Ensure the virtual attendee is not muted.
- On the control panel of the Teams Room device, ensure that the volume option has not been muted.
- Turn the volume up by tapping the "+" next to the volume icon in the meeting controls.
- By audio level 70, you should be able to hear the online participants.
- If this you are still unable to hear anyone from the online meeting, try leaving the meeting and re-joining.
- If this does not resolve the issue, please reach out to the UCCS Service Desk at (719) 255-4357
Video Troubleshooting
- Virtual attendees cannot see anyone in the Teams Room:
- Ensure that the camera is not disabled on the Teams Room device's control panel.
- If the camera icon on the meeting control bar has a line through it, the camera has been disabled. Tap this icon to re-enable the device's camera feed.
- Try leaving the meeting and re-joining.
- If this does not resolve the issue, please reach out to the UCCS Service Desk at (719) 255-4357
- The room has a conferencing device and is powered on, but there is no video output on the room display:
- Tap "More" on the control panel.
- Select "Restart".
- After restarting the device, if the issue persists, please call the UCCS Service Desk at (719) 255-4357
Video Tutorials
Videos showing how to use the system can be found here, for any additional help, please contact the UCCS Service Desk at (719) 255-4357.